This week I'm in a bit of a bind because I can't quite follow these rules when reviewing this 4x4 Tudor Building with Attic made by a friend of mine. Now before one of my twelve readers gets their panties in a bunch crying foul because I consider Jolly Blackburn a friend, let me explain.
This resin building I was sent to use & abuse wasn't .......how do I put this.....it wasn't "sale quality". I was warned that the pieces were "rough" and that some of the pieces were rejects. If I was to rate this product as-is I'd probably end up giving it 2, maybe 3 stars. If you, dear reader, rated this product based off of my review.....and my less-than-stellar paint job, you might even give it less. I cannot, in good conscious, rate this piece fairly because I'll end up either mis-representing the "normal" models or artificially inflate the end rating based on assumptions.
This isn't the only thing I've received from Amber's Secret Cove, so I'll be able to give a "regular" review on "regular" product later this month.
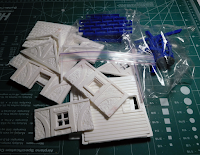
I was a bit excited when I got my box-o-stuff and snapped a quick pic of everything dumped out on my work surface. In addition to the building I got a bunch of stamps and a hanging cage. The cage, which is a bit delicate, had broken in transit. Not a big deal, especially since the stamps and this cage were "bonus" items tossed in because there was room.
I expected a little flash that I'd have to clean off, but this is where I really figured out what was meant by "rough". Some of the pieces were way too thick and you could see where an attempt or two was made at salvaging the pieces. The house is supposed to be 4" square, which would mean that I should have two longer walls and two shorter, but I got three longer and one shorter.
Hey, at least I didn't end up with 3 shorts and a long!
It didn't take too long to clean up the flash, cut one of the long side down, and get the pieces to fit. I did have one helluva time gluing up the house, but that was all on me. My superglue was at the end of it's shelf life. I really should have made a trip to the hobby store to not only get more superglue, but an accelerator spray. The glue-up was a complete pain in the ass and it was totally avoidable.
It occurs to me now that if I was a smart man I'd pick up a second model and use this whole thing as an educational opportunity on how to best put together one of these things. Hopefully I can get enough across in this post to help the next guy.
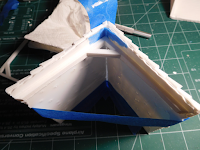
I did use some low-tack painters tape to help hold the walls in place while I glued the base. I thought that my gap-filling superglue would help here, but not really. I ended up with gaps in the corners, some of which could have been resolved by using better/faster glue. A good aspect about the bases for both floors is that the walls fit in rather well, even with the extra thickness I had to deal with.
 Working with the roof was another pain in the ass that I could have avoided, or at least minimized, if I had thought it out before hand. The roof comes in two pieces and these pieces were a bit proud/thick and they are supposed to be glued to two sets of rafters that have indents in the attic floor. I should have sanded the pieces down a bit so they'd rest better on those rafters. Then I should have glued the rafters in place temporarily with something like rubber cement. Then I could have used my superglue and kicker to quickly set the rafters to the roof. Instead I used my crappy glue and more tape, some of which I ended up having to chip off with a razor because it got glued in place.
Did I mention that evidently I suck at building models?
Once everything was glued up I had a bottom floor that wasn't level (the tops of the walls were at different heights), a good attic piece, and a roof with gaps that only fits well in one direction. At this point I was not too happy with my handiwork, but parts of my brain finally started working. I used a full sheet of 100 grit sandpaper to smooth out the bottom of the first floor, flipped the floor over to even up the tops of the walls, and then I smoothed out the bottom of the attic. I took some wall spackle, the kind that starts out pink and turns white as it dries, and filled in all of my corner gaps and the small gaps created with I cut off the ends of that third long wall. Once the spackle was dry I used a fine pick to outline the beam pieces that got spackle on them. The end effect was worthwhile.
I went to the store to pick up some primer and sealer I knew would work on resin. The store only had the white primer, which is normally not what I'd recommend, but I really didn't feel like priming in white and then covering the primer in black.......but that is exactly what I should have done. Painting up the model was fairly straight forward, but that white undercoat caused me more grief than it should have. Please learn from my mistake. Sure, my other paints might not have stuck to the resin, but they would have stuck to the white primer.
 Now I know I was dealing with some "off" parts, and I definitely didn't help things by not planning out ahead, but I am pretty happy
 with the results. The only criticism I can honestly put out there is that it is obvious that the model was based off of 3d printed parts. For the most part this doesn't matter, but the effect is quite noticeable on the roof shingles. I wish that the part had been smoothed out before making the mold master or that the master had been printed on its side. I think vertical lines through the shingles would have at least looked a bit more natural.
Price-wise this 4x4 Tudor Building with Attic is twice as expensive as purchasing a similar resin building from Armorcast, but a few buck cheaper than going with an unpainted Dwarven Forge building, which would be easier to assemble. Honestly, at first glance this model seems overpriced, and if I had to go with my experiences with this build, I wouldn't recommend it. Of course, now that I know better.....
The real value in going with these buildings from Amber's Secret Cove lies in customization and quantity. If you buy 4 buildings you get the 5th one free, bringing the per-unit price down to $28 before shipping. Now if you go this route I think you have to get some customization because that it the real differentiation between this set and the other guy's buildings. Get some buildings with two doors, or two widows (with panes). Mix things up a bit. These buildings are not mass-produced and personally I've found that the RPG bits and bobs you put a little effort into, like painted minis, end up being the ones you end up using the most.
If the buildings from Amber's Secret Cove don't do it for you, I suggest you take a closer look at the other offerings because there are some great things that you just don't find anywhere else.


0 comments :
Post a Comment